Nail писал(а): Ср мар 20, 2019 8:59 pm
Если не секрет как такую сцену создать? Знать когда и что "отлетело" от роутера(круто).
Конечно не секрет

Распишу полностью, что бы не собирать инфу по всей теме.
Создаешь mikrot.php в папке scripts
Код: Выделить всё
<?php
chdir(dirname(__FILE__) . '/../');
include_once('./config.php');
include_once('./lib/loader.php');

$ip    = $_SERVER['REMOTE_ADDR'];
$array = $_POST['wifi'];
//print_r($array);

$tmp1 = explode('|', $array);

foreach ($tmp1 as $i) {
    list($getcomment, $hostname, $capnumber, $rxsignal, $ip, $mac, $uptime, $timenow, $status) = explode(";", $i);

    if ($mac != '') {
        $wificlienttmp['getcomment'] = $getcomment;
        $wificlienttmp['hostname']   = $hostname;
        $wificlienttmp['capnumber']  = $capnumber;
        $wificlienttmp['rxsignal']   = $rxsignal;
        $wificlienttmp['ip']         = $ip;
        $wificlienttmp['mac']        = $mac;
        $wificlienttmp['uptime']     = $uptime;
        $wificlienttmp['timenow']    = $timenow;
        $wificlienttmp['status']     = $status;
        $wificlient[]                = $wificlienttmp;

        addClassObject('WiFiDevice', 'wifi_' . str_replace(":","",$wificlienttmp['mac']));
        $obj = getObject('wifi_' . str_replace(":","",$wificlienttmp['mac']));
        $obj->setProperty('getcomment', $wificlienttmp['getcomment']);
        $obj->setProperty('hostname', $wificlienttmp['hostname']);
        $obj->setProperty('capnumber', $wificlienttmp['capnumber']);
        $obj->setProperty('rxsignal', $wificlienttmp['rxsignal']);
        $obj->setProperty('ip', $wificlienttmp['ip']);
        $obj->setProperty('mac', $wificlienttmp['mac']);
        $obj->setProperty('uptime', $wificlienttmp['uptime']);
        $obj->setProperty('lastActive', 'Последняя проверка в ' . $wificlienttmp['timenow']);
        $obj->setProperty('status', $wificlienttmp['status']);
        //print_r($wificlienttmp);
    }
}
На микротике Systems -> Scripts создаешь скрипт:
Код: Выделить всё
:local url "http://СВОЙ_IP/scripts/mikrot.php";
:set $str "";
:foreach i in=[/ip dhcp-server lease find] do={
:local mac [/ip dhcp-server lease get $i mac-address];
:local timenow [/system clock get time];
:local ip [/ip dhcp-server lease get [/ip dhcp-server lease find where mac-address="$mac"] address];
:local getcomment [/ip dhcp-server lease get [/ip dhcp-server lease find where address="$ip"] comment];
:local hostname [/ip dhcp-server lease get [/ip dhcp-server lease find where mac-address="$mac"] host-name];
:local capnumber
:if ([ :len [/caps-man registration-table find where mac-address="$mac"] ] = 0 ) do={
    :set capnumber "-"
} else={
    :set capnumber [/caps-man registration-table get [/caps-man registration-table find where mac-address="$mac"] interface]
}
:local rxsignal
:if ([ :len [/caps-man registration-table find where mac-address="$mac"] ] = 0 ) do={
    :set rxsignal "-"
} else={
    :set rxsignal [/caps-man registration-table get [/caps-man registration-table find where mac-address="$mac"] rx-signal]
}
:local uptime
:if ([ :len [/caps-man registration-table find where mac-address="$mac"] ] = 0 ) do={
    :set uptime "-"
} else={
    :set uptime [/caps-man registration-table get [/caps-man registration-table find where mac-address="$mac"] uptime]
}
:local status
:if ([ :len [/caps-man registration-table find where mac-address="$mac"] ] = 0 ) do={
    :set status "offline"
} else={
    :set status "online"
}
:set $str "$str|$getcomment;$hostname;$capnumber;$rxsignal;$ip;$mac;$uptime;$timenow;$status";
}
:do {
/tool fetch mode=http url=$url keep-result=no dst-path="result.txt" http-method="post" http-data="wifi=$str";
} on-error={ log warning "Mojerdomo: Send to server Failed!" }
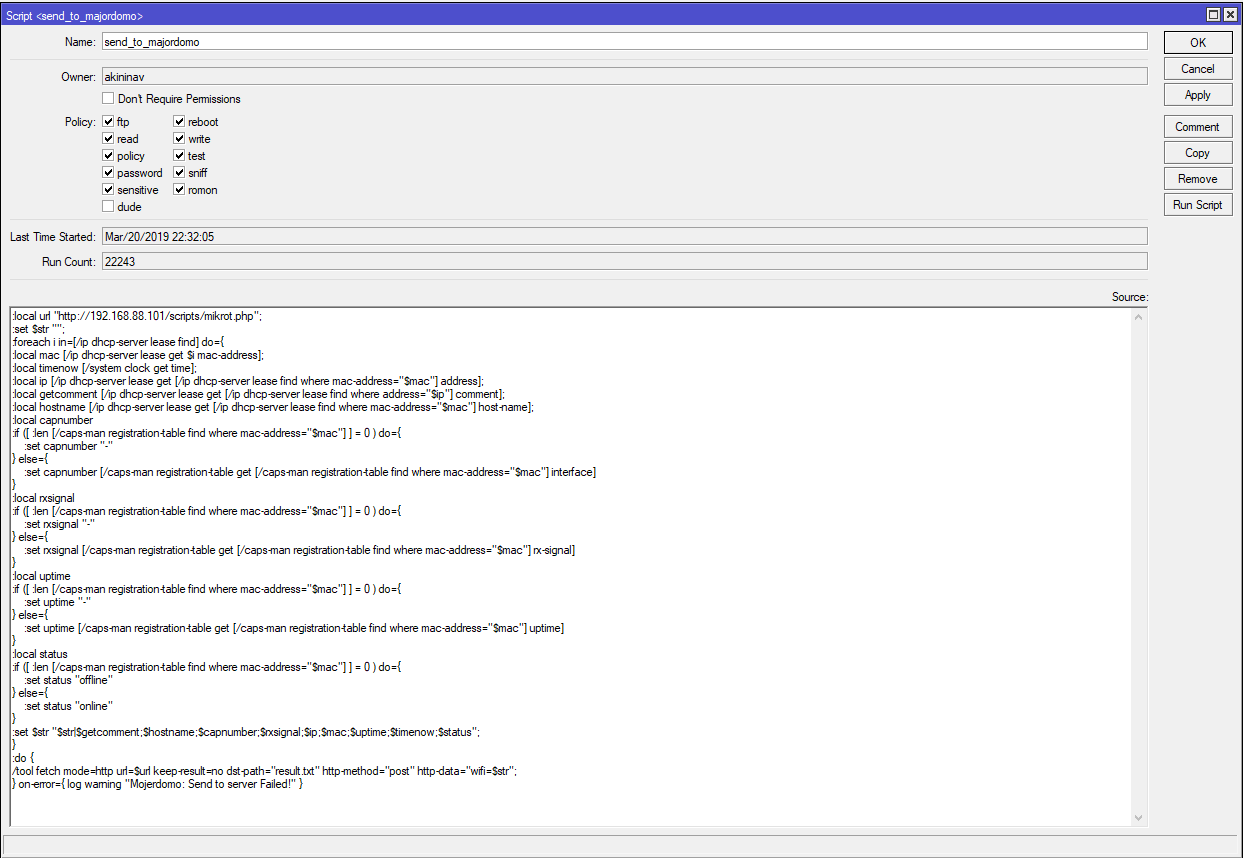
- script.PNG (54.14 КБ) 3031 просмотр
Потом в System -> Scheduler добавляешь задачу:
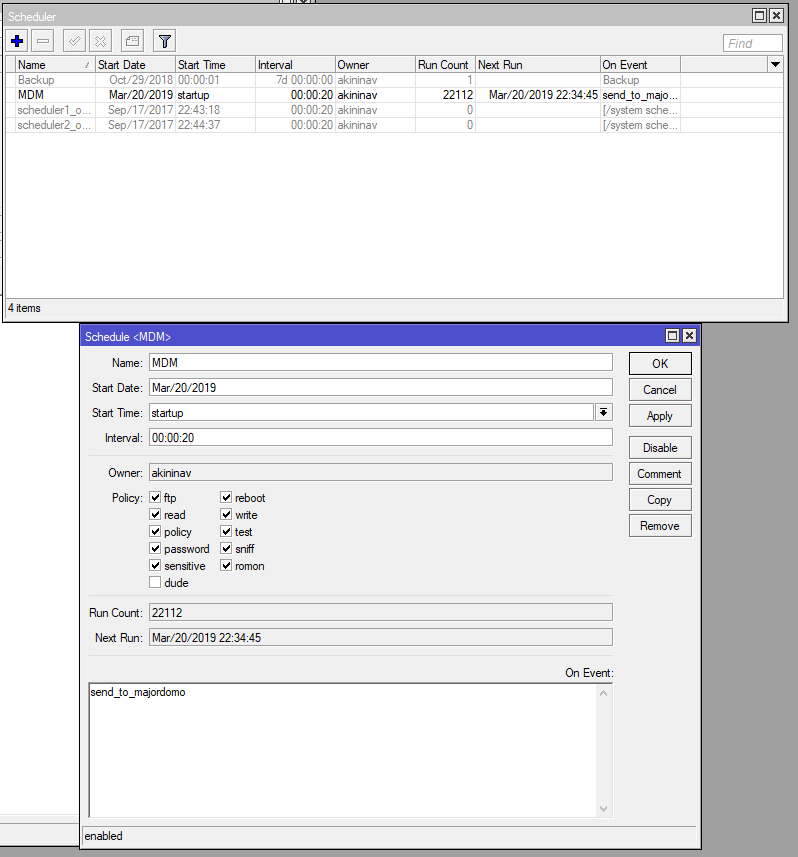
- scheduler.PNG (37.43 КБ) 3031 просмотр
Не забудь всем устройствам прописать комментарий, так как заголовок в дальнейшем строится из этого значения, а иначе будет пустота.
(все устройства присутствующие в микротике Ip -> DHCP Server -> Leases)
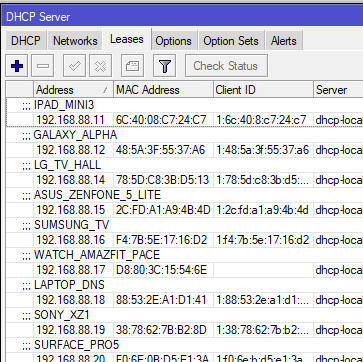
- dhcpserver.PNG (21.34 КБ) 3031 просмотр
Далее после первого запуска скрипта на микротике у тебя в mdm создастся класс WiFiDevice заполненный объектами.
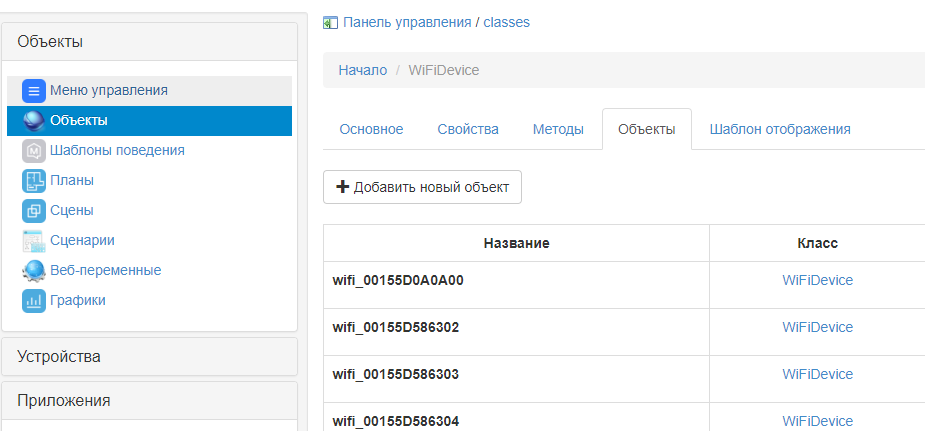
- objects.PNG (31.24 КБ) 3031 просмотр
Там же выбираешь шаблон отображения и вставляешь css и html:
Код: Выделить всё
<style>
table {
	width: 290px;
	margin-top: 3;
}
td .left {
	width: 110px;
	text-indent: 5;
}
td .right {
	width: 180px;
	text-indent: 5;
}
p {
	margin: -9 0 5px;
	text-align: center;
}
.panel-devices {
	position: absolute;
	bottom: 0;
	background-color: rgba(100, 100, 100, 0.75);
	border-radius: 5px;
}
.panel-devices .device {
	height: 100%;
}
.panel-devices .device .title {
	background-color: rgba(0, 0, 0, 0.5);
	font-size: 18px;
	line-height: 1.4;
	font-weight: 500;
	text-align: center;
	color: #ff6f4d;
}
.panel-devices .device .status-online {
	background-color: rgba(0, 0, 0, 0.5);
	text-align: center;
	font-size: 16;
	text-transform: uppercase;
	font-weight: 600;
	color: #00ff45;
}
.panel-devices .device .status-offline {
	background-color: rgba(0, 0, 0, 0.5);
	text-align: center;
	font-size: 16;
	text-transform: uppercase;
	font-weight: 600;
	color: #ff0000;
}
.panel-devices .device img {
	display: block;
	width: 50%;
	height: 17px;
	margin: auto;
}
.panel-devices .device .data {
	font-size: 14px;
}
</style>
<div class="panel-devices">
    <div class="device">
        <div class="title">%.getcomment%</div>
        <div class="data">
            <table>
                <tbody>
                    <tr>
                        <td class="left">HostName</td>
                        <td class="right">%.hostname%</td>
                    </tr>
                    <tr>
                        <td class="left">Точка</td>
                        <td class="right">%.capnumber%</td>
                    </tr>
                    <tr>
                        <td class="left">Сигнал</td>
                        <td class="right">%.rxsignal%</td>
                    </tr>
                    <tr>
                        <td class="left">IP адрес</td>
                        <td class="right">%.ip%</td>
                    </tr>
                    <tr>
                        <td class="left">MAC адрес</td>
                        <td class="right">%.mac%</td>
                    </tr>
                    <tr>
                        <td class="left">Время в сети</td>
                        <td class="right">%.uptime%</td>
                    </tr>
                </tbody>
            </table>
            <br>
            <p>%.lastActive%
        </div>
        <div class="status-%.status%">%.status%</div>
    </div>
</div>
Сохраняешь и на этом все готово, остается добавить объект в сцену или меню управления.
Создай пустую сцену:
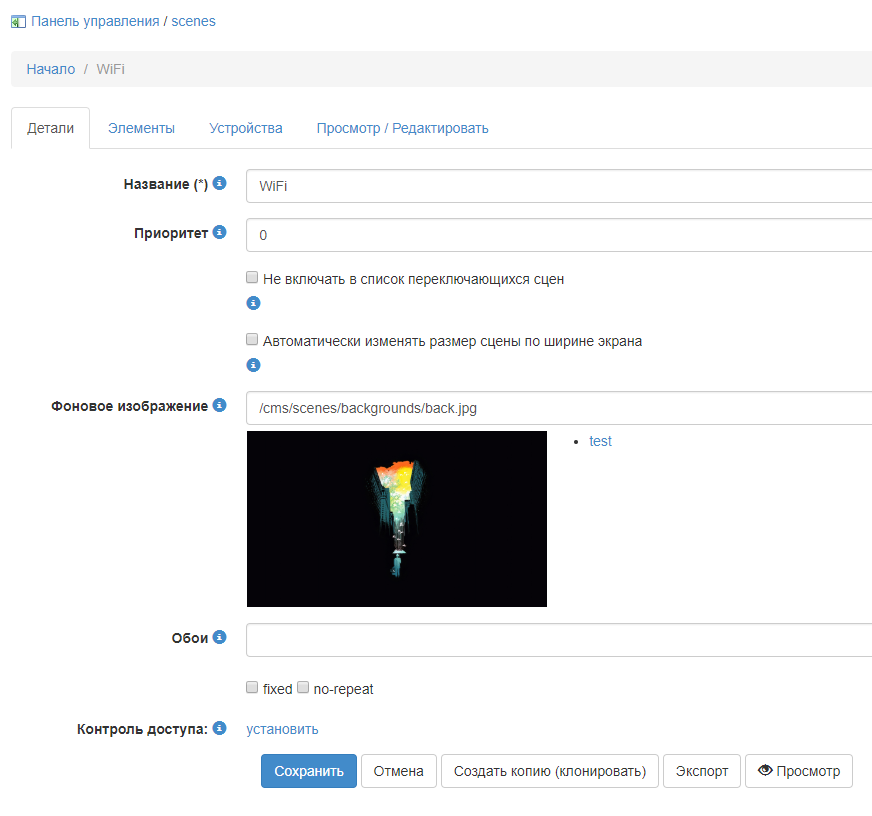
- scenes.PNG (47.5 КБ) 3031 просмотр
В элементах сцены создай элемент с типом объект и выбери любое необходимое устройство:
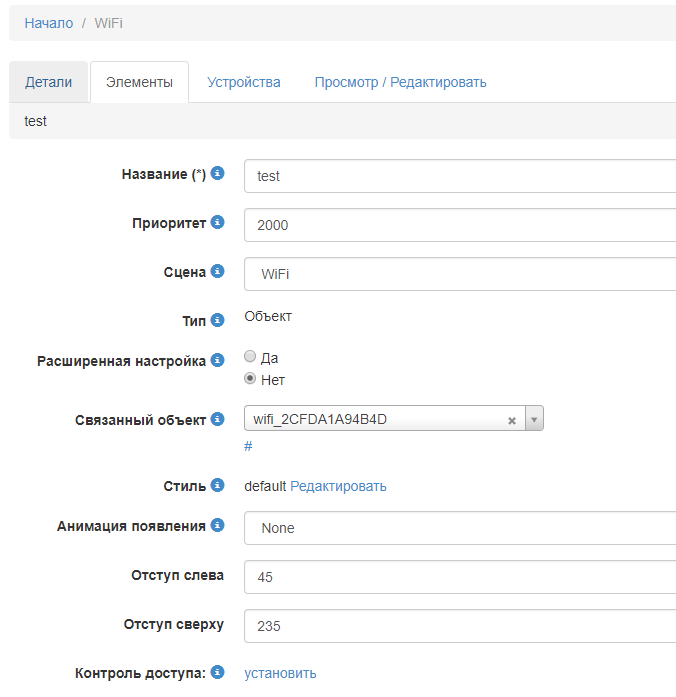
- element.PNG (21.25 КБ) 3031 просмотр
Ну и на этом все))
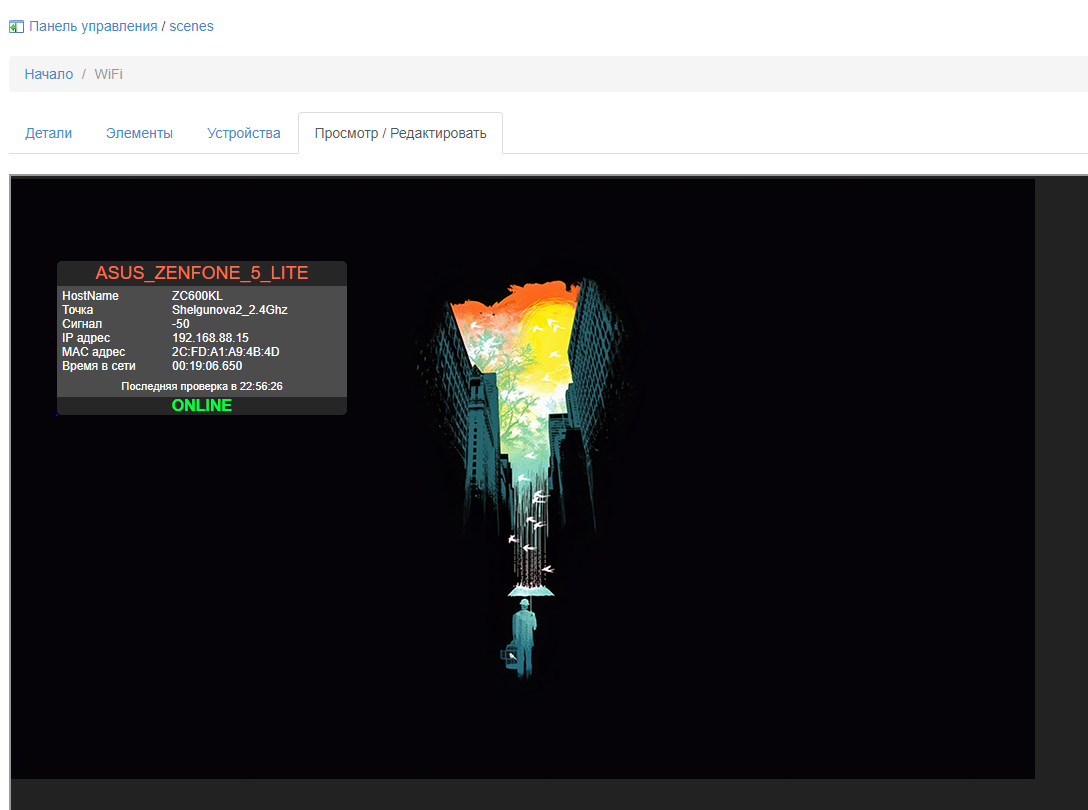
- scenes_preview.PNG (256.24 КБ) 3031 просмотр